Monday, November 16, 2015
Excel videos

Monday, November 2, 2015
Excel ShortCut Keys and Tips
Page 1 of 7
Excel ShortCut Keys and Tips
Enter data by using shortcut keys
To Press
Complete a cell entry ENTER
Cancel a cell entry ESC
Repeat the last action F4 or CTRL + Y
Start a new line in the same cell ALT + ENTER
Delete the character to the left of
the insertion point, or delete the
selection
BACKSPACE
Delete the character to the right of
the insertion point, or delete the
selection
DELETE
Delete text to the end of the line CTRL + DELETE
Move one character up, down, left,
or right
Arrow keys
Move to the beginning of the line HOME
Edit a cell comment SHIFT + F2
Create names from row and
column labels
CTRL + SHIFT
+ F3
Fill down CTRL + D
Fill to the right CTRL + R
Fill the selected cell range with the
current entry
CTRL + ENTER
Complete a cell entry and move
down in the selection
ENTER
Complete a cell entry and move up
in the selection
SHIFT + ENTER
Complete a cell entry and move to
the right in the selection
TAB
Complete a cell entry and move to
the left in the selection
SHIFT + TAB
Work in cells or the formula bar by using
shortcut keys
To Press
Start a formula = (EQUAL SIGN)
Cancel an entry in the cell or
formula bar
ESC
Edit the active cell F2
Edit the active cell and then clear
it, or delete the preceding
character in the active cell as you
edit the cell contents
BACKSPACE
Paste a name into a formula F3
Define a name CTRL + F3
Calculate all sheets in all open
workbooks
F9
Calculate the active worksheet SHIFT + F9
Insert the AutoSum formula ALT + = (EQUAL
SIGN)
Enter the date CTRL + ;
(SEMICOLON)
Enter the time CTRL + SHIFT + :
(COLON)
Insert a hyperlink CTRL + K
Complete a cell entry ENTER
Copy the value from the cell
above the active cell into the cell
or the formula bar
CTRL + SHIFT
+ " (QUOTATION
MARK)
Alternate between displaying cell
values and displaying cell
formulas
CTRL + ` (SINGLE
LEFT QUOTATION
MARK)
Copy a formula from the cell
above the active cell into the cell
or the formula bar
CTRL + '
(APOSTROPHE)
Enter a formula as an array
formula
CTRL + SHIFT
+ ENTER
Display the Formula Palette after
you type a valid function name in
a formula
CTRL + A
Insert the argument names and
parentheses for a function, after
you type a valid function name in
a formula
CTRL + SHIFT
+ A
Display the AutoComplete list ALT +
DOWN ARROW
Format data by using shortcut keys
To Press
Display the Style command
(Format menu)
ALT + '
(APOSTROPHE)
Display the Cells command
(Format menu)
CTRL + 1
Apply the General number format CTRL + SHIFT
+ ~
Apply the Currency format with
two decimal places (negative
numbers appear in parentheses)
CTRL + SHIFT
+ $
Apply the Percentage format with
no decimal places
CTRL + SHIFT + %
Apply the Exponential number
format with two decimal places
CTRL + SHIFT + ^
Apply the Date format with the
day, month, and year
CTRL + SHIFT + #
Apply the Time format with the
hour and minute, and indicate
A.M. or P.M.
CTRL + SHIFT
+ @
Apply the Number format with
two decimal places, 1000
separator, and – for negative
values
CTRL + SHIFT + !
Apply the outline border CTRL + SHIFT
+ &
Remove all borders CTRL + SHIFT + _
Apply or remove bold formatting CTRL + B
Excel
Page 2 of 7
Apply or remove italic formatting CTRL + I
Apply or remove an underline CTRL + U
Apply or remove strikethrough
formatting
CTRL + 5
Hide rows CTRL + 9
Unhide rows CTRL + SHIFT + (
Hide columns CTRL + 0 (ZERO)
Unhide columns CTRL + SHIFT + )
Edit data by using shortcut keys
To Press
Edit the active cell F2
Cancel an entry in the cell or
formula bar
ESC
Edit the active cell and then clear
it, or delete the preceding
character in the active cell as you
edit the cell contents
BACKSPACE
Paste a name into a formula F3
Complete a cell entry ENTER
Enter a formula as an array
formula
CTRL + SHIFT
+ ENTER
Display the Formula Palette after
you type a valid function name in
a formula
CTRL + A
Insert the argument names and
parentheses for a function, after
you type a valid function name in
a formula
CTRL + SHIFT + A
Insert, delete, and copy a selection by using
shortcut keys
To Press
Copy the selection CTRL + C
Paste the selection CTRL + V
Cut the selection CTRL + X
Clear the contents of the selection DELETE
Insert blank cells CTRL + SHIFT
+ PLUS SIGN
Delete the selection CTRL + –
Undo the last action CTRL + Z
Move within a selection by using shortcut keys
To Press
Move from top to bottom within
the selection (down), or in the
direction that is selected on the
Edit tab (Tools menu, Options
command)
ENTER
Move from bottom to top within
the selection (up), or opposite to
the direction that is selected on the
Edit tab (Tools menu, Options
command)
SHIFT + ENTER
Move from left to right within the
selection, or move down one cell
if only one column is selected
TAB
Move from right to left within the
selection, or move up one cell if
only one column is selected
SHIFT + TAB
Move clockwise to the next corner
of the selection
CTRL + PERIOD
Move to the right between
nonadjacent selections
CTRL + ALT
+ RIGHT ARROW
Move to the left between
nonadjacent selections
CTRL + ALT
+ LEFT ARROW
Select cells, columns, rows, or objects in
worksheets and workbooks by using shortcut keys
To Press
Select the current region around
the active cell (the current region
is an area enclosed by blank rows
and blank columns)
CTRL + SHIFT + *
(ASTERISK)
Extend the selection by one cell SHIFT + arrow key
Extend the selection to the last
nonblank cell in the same column
or row as the active cell
CTRL + SHIFT
+ arrow key
Extend the selection to the
beginning of the row
SHIFT + HOME
Extend the selection to the
beginning of the worksheet
CTRL + SHIFT
+ HOME
Extend the selection to the last cell
used on the worksheet (lower-right
corner)
CTRL + SHIFT
+ END
Select the entire column CTRL +
SPACEBAR
Select the entire row SHIFT
+ SPACEBAR
Select the entire worksheet CTRL + A
If multiple cells are selected,
select only the active cell
SHIFT
+ BACKSPACE
Extend the selection down one
screen
SHIFT
+ PAGE DOWN
Extend the selection up one screen SHIFT + PAGE UP
With an object selected, select all
objects on a sheet
CTRL + SHIFT
+ SPACEBAR
Alternate between hiding objects,
displaying objects, and displaying
placeholders for objects
CTRL + 6
Show or hide the Standard toolbar CTRL + 7
In End mode, to Press
Turn End mode on or off END
Extend the selection to the last
nonblank cell in the same column
or row as the active cell
END, SHIFT
+ arrow key
Extend the selection to the last cell
used on the worksheet (lower-right
corner)
END, SHIFT
+ HOME
Excel
Page 3 of 7
Extend the selection to the last cell
in the current row; this keystroke
is unavailable if you selected the
Transition navigation keys check
box on the Transition tab (Tools
menu, Options command)
END, SHIFT
+ ENTER
With SCROLL LOCK on, to Press
Turn SCROLL LOCK on or off SCROLL LOCK
Scroll the screen up or down one
row
UP ARROW or
DOWN ARROW
Scroll the screen left or right one
column
LEFT ARROW or
RIGHT ARROW
Extend the selection to the cell in
the upper-left corner of the
window
SHIFT + HOME
Extend the selection to the cell in
the lower-right corner of the
window
SHIFT + END
Tip When you use the scrolling keys (such as PAGE UP
and PAGE DOWN) with SCROLL LOCK turned off, your
selection moves the distance you scroll. If you want to
keep the same selection as you scroll, turn on SCROLL
LOCK first.
Select cells with special characteristics by using
shortcut keys
To Press
Select the current region around
the active cell (the current region
is an area enclosed by blank rows
and blank columns)
CTRL + SHIFT + *
(ASTERISK)
Select the current array, which is
the array that the active cell
belongs to
CTRL + /
Select all cells with comments CTRL + SHIFT
+ O (the letter O)
Select cells whose contents are
different from the comparison cell
in each row (for each row, the
comparison cell is in the same
column as the active cell)
CTRL + \
Select cells whose contents are
different from the comparison cell
in each column (for each column,
the comparison cell is in the same
row as the active cell)
CTRL + SHIFT + |
Select only cells that are directly
referred to by formulas in the
selection
CTRL + [
Select all cells that are directly or
indirectly referred to by formulas
in the selection
CTRL + SHIFT + {
Select only cells with formulas
that refer directly to the active cell
CTRL + ]
Select all cells with formulas that
refer directly or indirectly to the
active cell
CTRL + SHIFT + }
Select only visible cells in the
current selection
ALT
+ SEMICOLON
Select chart items by using shortcut keys
To Press
Select the previous group of items DOWN ARROW
Select the next group of items UP ARROW
Select the next item within the
group
RIGHT ARROW
Select the previous item within the
group
LEFT ARROW
Move and scroll on a worksheet or workbook by
using shortcut keys
To Press
Move one cell in a given direction Arrow key
Move to the edge of the current
data region
CTRL + arrow key
Move between unlocked cells on a
protected worksheet
TAB
Move to the beginning of the row HOME
Move to the beginning of the
worksheet
CTRL + HOME
Move to the last cell on the
worksheet, which is the cell at the
intersection of the right-most used
column and the bottom-most used
row (in the lower-right corner);
cell opposite the Home cell, which
is typically A1
CTRL + END
Move down one screen PAGE DOWN
Move up one screen PAGE UP
Move one screen to the right ALT
+ PAGE DOWN
Move one screen to the left ALT + PAGE UP
Move to the next sheet in the
workbook
CTRL
+ PAGE DOWN
Move to the previous sheet in the
workbook
CTRL + PAGE UP
Move to the next workbook or
window
CTRL + F6 or
CTRL + TAB
Move to the previous workbook or
window
CTRL + SHIFT
+ F6 or CTRL
+ SHIFT + TAB
Move to the next pane F6
Move to the previous pane SHIFT + F6
Scroll to display the active cell CTRL
+ BACKSPACE
In End mode, to Press
Turn End mode on or off END
Move by one block of data within
a row or column
END, arrow key
Excel
Page 4 of 7
Move to the last cell on the
worksheet, which is the cell at the
intersection of the right-most used
column and the bottom-most used
row (in the lower-right corner);
cell opposite the Home cell, which
is typically A1
END, HOME
Move to the last cell to the right in
the current row that is not blank;
unavailable if you have selected
the Transition navigation keys
check box on the Transition tab
(Tools menu, Options command)
END, ENTER
With SCROLL LOCK turned
on, to
Press
Turn SCROLL LOCK on or off SCROLL LOCK
Move to the cell in the upper-left
corner of the window
HOME
Move to the cell in the lower-right
corner of the window
END
Scroll one row up or down UP ARROW or
DOWN ARROW
Scroll one column left or right LEFT ARROW or
RIGHT ARROW
Tip When you use the scrolling keys (such as PAGE UP
and PAGE DOWN) with SCROLL LOCK turned off, your
selection moves the distance you scroll. If you want to
preserve your selection while you scroll through the
worksheet, turn on SCROLL LOCK first.
Print and preview a document by using shortcut
keys
To Press
Display the Print command (File
menu)
CTRL + P
Work in print preview
To Press
Move around the page when
zoomed in
Arrow keys
Move by one page when zoomed
out
PAGE UP or PAGE
DOWN
Move to the first page when
zoomed out
CTRL + UP
ARROW or CTRL +
LEFT ARROW
Move to the last page when
zoomed out
CTRL + DOWN
ARROW or CTRL +
RIGHT ARROW
Work in a data form by using shortcut keys
To Press
Select a field or a command button ALT + key, where
key is the underlined
letter in the field or
command name
Move to the same field in the next
record
DOWN ARROW
Move to the same field in the
previous record
UP ARROW
Move to the next field you can edit
in the record
TAB
Move to the previous field you can
edit in the record
SHIFT + TAB
Move to the first field in the next
record
ENTER
Move to the first field in the
previous record
SHIFT + ENTER
Move to the same field 10 records
forward
PAGE DOWN
Move to the same field 10 records
back
PAGE UP
Move to the new record CTRL
+ PAGE DOWN
Move to the first record CTRL + PAGE UP
Move to the beginning or end of a
field
HOME or END
Move one character left or right
within a field
LEFT ARROW or
RIGHT ARROW
Extend a selection to the
beginning of a field
SHIFT + HOME
Extend a selection to the end of a
field
SHIFT + END
Select the character to the left SHIFT + LEFT
ARROW
Select the character to the right SHIFT + RIGHT
ARROW
Work with the AutoFilter feature by using
shortcut keys
To Press
Display the AutoFilter list for the
current column
Select the cell that
contains the column
label, and then press
ALT
+ DOWN ARROW
Close the AutoFilter list for the
current column
ALT + UP ARROW
Select the next item in the
AutoFilter list
DOWN ARROW
Select the previous item in the
AutoFilter list
UP ARROW
Select the first item (All) in the
AutoFilter list
HOME
Select the last item in the
AutoFilter list
END
Filter the list by using the selected
item in the AutoFilter list
ENTER
Excel
Page 5 of 7
Work with the Pivot Table Wizard by using
shortcut keys
In Step 3 of the PivotTable
Wizard, to
Press
Select the next or previous field
button in the list
UP ARROW or
DOWN ARROW
Select the field button to the right
or left in a multicolumn field
button list
LEFT ARROW or
RIGHT ARROW
Move the selected field into the
Page area
ALT + P
Move the selected field into the
Row area
ALT + R
Move the selected field into the
Column area
ALT + C
Move the selected field into the
Data area
ALT + D
Display the PivotTable Field
dialog box
ALT + L
Work with page fields in a Pivot Table by using
shortcut keys
To Press
Select the previous item in the list UP ARROW
Select the next item in the list DOWN ARROW
Select the first visible item in the
list
HOME
Select the last visible item in the
list
END
Display the selected item ENTER
Group and ungroup Pivot Table items by using
shortcut keys
To Press
Group selected PivotTable items ALT + SHIFT
+ RIGHT ARROW
Ungroup selected PivotTable
items
ALT + SHIFT
+ LEFT ARROW
Keys for menus
To Press
Show a shortcut menu SHIFT + F10
Make the menu bar active F10 or ALT
Show the program icon menu (on
the program title bar)
ALT + SPACEBAR
Select the next or previous
command on the menu or
submenu
DOWN ARROW or
UP ARROW (with
the menu or
submenu displayed)
Select the menu to the left or right,
or, with a submenu visible, switch
between the main menu and the
submenu
LEFT ARROW or
RIGHT ARROW
Select the first or last command on
the menu or submenu
HOME or END
Close the visible menu and
submenu at the same time
ALT
Close the visible menu, or, with a
submenu visible, close the
submenu only
ESC
Tip You can select any menu command on the menu bar
or on a visible toolbar with the keyboard. Press ALT to
select the menu bar. (To then select a toolbar, press CTRL
+ TAB; repeat until the toolbar you want is selected.)
Press the letter that is underlined in the menu name that
contains the command you want. In the menu that appears,
press the letter underlined in the command name that you
want.
Keys for toolbars
On a toolbar, to Press
Make the menu bar active F10 or ALT
Select the next or previous toolbar CTRL + TAB or
CTRL + SHIFT +
TAB
Select the next or previous button
or menu on the toolbar
TAB or SHIFT +
TAB (when a toolbar
is active)
Open the selected menu ENTER
Perform the action assigned to the
selected button
ENTER
Enter text in the selected text box ENTER
Select an option from a drop-down
list box or from a drop-down
menu on a button
Arrow keys to move
through options in
the list or menu;
ENTER to select the
option you want
(when a drop-down
list box is selected)
Keys for windows and dialog boxes
In a window, to Press
Switch to the next program ALT + TAB
Switch to the previous program ALT + SHIFT
+ TAB
Show the Windows Start menu CTRL + ESC
Close the active workbook
window
CTRL + W
Restore the active workbook
window
CTRL + F5
Switch to the next workbook
window
CTRL + F6
Switch to the previous workbook
window
CTRL + SHIFT
+ F6
Carry out the Move command
(workbook icon menu, menu bar)
CTRL + F7
Carry out the Size command
(workbook icon menu, menu bar)
CTRL + F8
Minimize the workbook window
to an icon
CTRL + F9
Excel
Page 6 of 7
Maximize or restore the workbook
window
CTRL + F10
Select a folder in the Open or Save
As dialog box (File menu)
ALT + 0 to select the
folder list; arrow
keys to select a
folder
Choose a toolbar button in the
Open or Save As dialog box (File
menu)
ALT + number
(1 is the leftmost
button, 2 is the next,
and so on)
Update the files visible in the
Open or Save As dialog box (File
menu)
F5
In a dialog box, to Press
Switch to the next tab in a dialog
box
CTRL + TAB or
CTRL + PAGE
DOWN
Switch to the previous tab in a
dialog box
CTRL + SHIFT +
TAB or CTRL +
PAGE UP
Move to the next option or option
group
TAB
Move to the previous option or
option group
SHIFT + TAB
Move between options in the
active drop-down list box or
between some options in a group
of options
Arrow keys
Perform the action assigned to the
active button (the button with the
dotted outline), or select or clear
the active check box
SPACEBAR
Move to an option in a drop-down
list box
Letter key for the
first letter in the
option name you
want (when a dropdown
list box is
selected)
Select an option, or select or clear
a check box
ALT + letter, where
letter is the key for
the underlined letter
in the option name
Open the selected drop-down list
box
ALT + DOWN
ARROW
Close the selected drop-down list
box
ESC
Perform the action assigned to the
default command button in the
dialog box (the button with the
bold outline ¾ often the OK
button)
ENTER
Cancel the command and close the
dialog box
ESC
In a text box, to Press
Move to the beginning of the entry HOME
Move to the end of the entry END
Move one character to the left or
right
LEFT ARROW or
RIGHT ARROW
Move one word to the left or right CTRL + LEFT
ARROW or CTRL +
RIGHT ARROW
Select from the insertion point to
the beginning of the entry
SHIFT + HOME
Select from the insertion point to
the end of the entry
SHIFT + END
Select or unselect one character to
the left
SHIFT + LEFT
ARROW
Select or unselect one character to
the right
SHIFT + RIGHT
ARROW
Select or unselect one word to the
left
CTRL + SHIFT +
LEFT ARROW
Select or unselect one word to the
right
CTRL + SHIFT +
RIGHT ARROW
Keys for using the Office Assistant
To Press
Make the Office Assistant the
active balloon
ALT + F6;
repeat until the
balloon is active
Select a Help topic from the topics
displayed by the Office Assistant
ALT + topic number
(where 1 is the first
topic, 2 is the
second, and so on)
See more help topics ALT + DOWN
ARROW
See previous help topics ALT + UP ARROW
Close an Office Assistant message ESC
Get Help from the Office Assistant F1
Display the next tip ALT + N
Display the previous tip ALT + B
Close tips ESC
Show or hide the Office Assistant
in a wizard
TAB to select the
Office Assistant
button; SPACEBAR
to show or hide the
Assistant
Function Keys
Press To
F1 Display Help or
the Office
Assistant
SHIFT + F1 What's This?
ALT + F1 Insert a chart sheet
ALT + SHIFT + F1 Insert a new
worksheet
F2 Edit the active cell
SHIFT + F2 Edit a cell
comment
ALT + F2 Save As command
ALT + SHIFT + F2 Save command
Excel
Page 7 of 7
F3 Paste a name into a
formula
SHIFT + F3 Paste a function
into a formula
CTRL + F3 Define a name
CTRL + ALT + F3 Create names by
using row and
column labels
F4 Repeat the last
action
SHIFT + F4 Repeat the last
Find (Find Next)
CTRL + F4 Close the window
ALT + F4 Exit
F5 Go To
SHIFT + F5 Display the Find
dialog box
CTRL + F5 Restore the
window size
F6 Move to the next
pane
SHIFT + F6 Move to the
previous pane
CTRL + F6 Move to the next
workbook window
CTRL + SHIFT + F6 Move to the
previous workbook
window
F7 Spelling command
CTRL + F7 Move the window
F8 Extend a selection
SHIFT + F8 Add to the
selection
CTRL + F8 Resize the window
ALT + F8 Display the Macro
dialog box
F9 Calculate all sheets
in all open
workbooks
SHIFT + F9 Calculate the
active worksheet
CTRL + F9 Minimize the
workbook
F10 Make the menu bar
active
SHIFT + F10 Display a shortcut
menu
CTRL + F10 Maximize or
restore the
workbook window
F11 Create a chart
SHIFT + F11 Insert a new
worksheet
CTRL + F11 Insert a Microsoft
Excel 4.0 macro
sheet
ALT + F11 Display Visual
Basic Editor
F12 Save As command
SHIFT + F12 Save command
CTRL + F12 Open command
CTRL + SHIFT + F12 Print commandExcel
Page 1 of 7
Excel ShortCut Keys and Tips
Enter data by using shortcut keys
To Press
Complete a cell entry ENTER
Cancel a cell entry ESC
Repeat the last action F4 or CTRL + Y
Start a new line in the same cell ALT + ENTER
Delete the character to the left of
the insertion point, or delete the
selection
BACKSPACE
Delete the character to the right of
the insertion point, or delete the
selection
DELETE
Delete text to the end of the line CTRL + DELETE
Move one character up, down, left,
or right
Arrow keys
Move to the beginning of the line HOME
Edit a cell comment SHIFT + F2
Create names from row and
column labels
CTRL + SHIFT
+ F3
Fill down CTRL + D
Fill to the right CTRL + R
Fill the selected cell range with the
current entry
CTRL + ENTER
Complete a cell entry and move
down in the selection
ENTER
Complete a cell entry and move up
in the selection
SHIFT + ENTER
Complete a cell entry and move to
the right in the selection
TAB
Complete a cell entry and move to
the left in the selection
SHIFT + TAB
Work in cells or the formula bar by using
shortcut keys
To Press
Start a formula = (EQUAL SIGN)
Cancel an entry in the cell or
formula bar
ESC
Edit the active cell F2
Edit the active cell and then clear
it, or delete the preceding
character in the active cell as you
edit the cell contents
BACKSPACE
Paste a name into a formula F3
Define a name CTRL + F3
Calculate all sheets in all open
workbooks
F9
Calculate the active worksheet SHIFT + F9
Insert the AutoSum formula ALT + = (EQUAL
SIGN)
Enter the date CTRL + ;
(SEMICOLON)
Enter the time CTRL + SHIFT + :
(COLON)
Insert a hyperlink CTRL + K
Complete a cell entry ENTER
Copy the value from the cell
above the active cell into the cell
or the formula bar
CTRL + SHIFT
+ " (QUOTATION
MARK)
Alternate between displaying cell
values and displaying cell
formulas
CTRL + ` (SINGLE
LEFT QUOTATION
MARK)
Copy a formula from the cell
above the active cell into the cell
or the formula bar
CTRL + '
(APOSTROPHE)
Enter a formula as an array
formula
CTRL + SHIFT
+ ENTER
Display the Formula Palette after
you type a valid function name in
a formula
CTRL + A
Insert the argument names and
parentheses for a function, after
you type a valid function name in
a formula
CTRL + SHIFT
+ A
Display the AutoComplete list ALT +
DOWN ARROW
Format data by using shortcut keys
To Press
Display the Style command
(Format menu)
ALT + '
(APOSTROPHE)
Display the Cells command
(Format menu)
CTRL + 1
Apply the General number format CTRL + SHIFT
+ ~
Apply the Currency format with
two decimal places (negative
numbers appear in parentheses)
CTRL + SHIFT
+ $
Apply the Percentage format with
no decimal places
CTRL + SHIFT + %
Apply the Exponential number
format with two decimal places
CTRL + SHIFT + ^
Apply the Date format with the
day, month, and year
CTRL + SHIFT + #
Apply the Time format with the
hour and minute, and indicate
A.M. or P.M.
CTRL + SHIFT
+ @
Apply the Number format with
two decimal places, 1000
separator, and – for negative
values
CTRL + SHIFT + !
Apply the outline border CTRL + SHIFT
+ &
Remove all borders CTRL + SHIFT + _
Apply or remove bold formatting CTRL + B
Excel
Page 2 of 7
Apply or remove italic formatting CTRL + I
Apply or remove an underline CTRL + U
Apply or remove strikethrough
formatting
CTRL + 5
Hide rows CTRL + 9
Unhide rows CTRL + SHIFT + (
Hide columns CTRL + 0 (ZERO)
Unhide columns CTRL + SHIFT + )
Edit data by using shortcut keys
To Press
Edit the active cell F2
Cancel an entry in the cell or
formula bar
ESC
Edit the active cell and then clear
it, or delete the preceding
character in the active cell as you
edit the cell contents
BACKSPACE
Paste a name into a formula F3
Complete a cell entry ENTER
Enter a formula as an array
formula
CTRL + SHIFT
+ ENTER
Display the Formula Palette after
you type a valid function name in
a formula
CTRL + A
Insert the argument names and
parentheses for a function, after
you type a valid function name in
a formula
CTRL + SHIFT + A
Insert, delete, and copy a selection by using
shortcut keys
To Press
Copy the selection CTRL + C
Paste the selection CTRL + V
Cut the selection CTRL + X
Clear the contents of the selection DELETE
Insert blank cells CTRL + SHIFT
+ PLUS SIGN
Delete the selection CTRL + –
Undo the last action CTRL + Z
Move within a selection by using shortcut keys
To Press
Move from top to bottom within
the selection (down), or in the
direction that is selected on the
Edit tab (Tools menu, Options
command)
ENTER
Move from bottom to top within
the selection (up), or opposite to
the direction that is selected on the
Edit tab (Tools menu, Options
command)
SHIFT + ENTER
Move from left to right within the
selection, or move down one cell
if only one column is selected
TAB
Move from right to left within the
selection, or move up one cell if
only one column is selected
SHIFT + TAB
Move clockwise to the next corner
of the selection
CTRL + PERIOD
Move to the right between
nonadjacent selections
CTRL + ALT
+ RIGHT ARROW
Move to the left between
nonadjacent selections
CTRL + ALT
+ LEFT ARROW
Select cells, columns, rows, or objects in
worksheets and workbooks by using shortcut keys
To Press
Select the current region around
the active cell (the current region
is an area enclosed by blank rows
and blank columns)
CTRL + SHIFT + *
(ASTERISK)
Extend the selection by one cell SHIFT + arrow key
Extend the selection to the last
nonblank cell in the same column
or row as the active cell
CTRL + SHIFT
+ arrow key
Extend the selection to the
beginning of the row
SHIFT + HOME
Extend the selection to the
beginning of the worksheet
CTRL + SHIFT
+ HOME
Extend the selection to the last cell
used on the worksheet (lower-right
corner)
CTRL + SHIFT
+ END
Select the entire column CTRL +
SPACEBAR
Select the entire row SHIFT
+ SPACEBAR
Select the entire worksheet CTRL + A
If multiple cells are selected,
select only the active cell
SHIFT
+ BACKSPACE
Extend the selection down one
screen
SHIFT
+ PAGE DOWN
Extend the selection up one screen SHIFT + PAGE UP
With an object selected, select all
objects on a sheet
CTRL + SHIFT
+ SPACEBAR
Alternate between hiding objects,
displaying objects, and displaying
placeholders for objects
CTRL + 6
Show or hide the Standard toolbar CTRL + 7
In End mode, to Press
Turn End mode on or off END
Extend the selection to the last
nonblank cell in the same column
or row as the active cell
END, SHIFT
+ arrow key
Extend the selection to the last cell
used on the worksheet (lower-right
corner)
END, SHIFT
+ HOME
Excel
Page 3 of 7
Extend the selection to the last cell
in the current row; this keystroke
is unavailable if you selected the
Transition navigation keys check
box on the Transition tab (Tools
menu, Options command)
END, SHIFT
+ ENTER
With SCROLL LOCK on, to Press
Turn SCROLL LOCK on or off SCROLL LOCK
Scroll the screen up or down one
row
UP ARROW or
DOWN ARROW
Scroll the screen left or right one
column
LEFT ARROW or
RIGHT ARROW
Extend the selection to the cell in
the upper-left corner of the
window
SHIFT + HOME
Extend the selection to the cell in
the lower-right corner of the
window
SHIFT + END
Tip When you use the scrolling keys (such as PAGE UP
and PAGE DOWN) with SCROLL LOCK turned off, your
selection moves the distance you scroll. If you want to
keep the same selection as you scroll, turn on SCROLL
LOCK first.
Select cells with special characteristics by using
shortcut keys
To Press
Select the current region around
the active cell (the current region
is an area enclosed by blank rows
and blank columns)
CTRL + SHIFT + *
(ASTERISK)
Select the current array, which is
the array that the active cell
belongs to
CTRL + /
Select all cells with comments CTRL + SHIFT
+ O (the letter O)
Select cells whose contents are
different from the comparison cell
in each row (for each row, the
comparison cell is in the same
column as the active cell)
CTRL + \
Select cells whose contents are
different from the comparison cell
in each column (for each column,
the comparison cell is in the same
row as the active cell)
CTRL + SHIFT + |
Select only cells that are directly
referred to by formulas in the
selection
CTRL + [
Select all cells that are directly or
indirectly referred to by formulas
in the selection
CTRL + SHIFT + {
Select only cells with formulas
that refer directly to the active cell
CTRL + ]
Select all cells with formulas that
refer directly or indirectly to the
active cell
CTRL + SHIFT + }
Select only visible cells in the
current selection
ALT
+ SEMICOLON
Select chart items by using shortcut keys
To Press
Select the previous group of items DOWN ARROW
Select the next group of items UP ARROW
Select the next item within the
group
RIGHT ARROW
Select the previous item within the
group
LEFT ARROW
Move and scroll on a worksheet or workbook by
using shortcut keys
To Press
Move one cell in a given direction Arrow key
Move to the edge of the current
data region
CTRL + arrow key
Move between unlocked cells on a
protected worksheet
TAB
Move to the beginning of the row HOME
Move to the beginning of the
worksheet
CTRL + HOME
Move to the last cell on the
worksheet, which is the cell at the
intersection of the right-most used
column and the bottom-most used
row (in the lower-right corner);
cell opposite the Home cell, which
is typically A1
CTRL + END
Move down one screen PAGE DOWN
Move up one screen PAGE UP
Move one screen to the right ALT
+ PAGE DOWN
Move one screen to the left ALT + PAGE UP
Move to the next sheet in the
workbook
CTRL
+ PAGE DOWN
Move to the previous sheet in the
workbook
CTRL + PAGE UP
Move to the next workbook or
window
CTRL + F6 or
CTRL + TAB
Move to the previous workbook or
window
CTRL + SHIFT
+ F6 or CTRL
+ SHIFT + TAB
Move to the next pane F6
Move to the previous pane SHIFT + F6
Scroll to display the active cell CTRL
+ BACKSPACE
In End mode, to Press
Turn End mode on or off END
Move by one block of data within
a row or column
END, arrow key
Excel
Page 4 of 7
Move to the last cell on the
worksheet, which is the cell at the
intersection of the right-most used
column and the bottom-most used
row (in the lower-right corner);
cell opposite the Home cell, which
is typically A1
END, HOME
Move to the last cell to the right in
the current row that is not blank;
unavailable if you have selected
the Transition navigation keys
check box on the Transition tab
(Tools menu, Options command)
END, ENTER
With SCROLL LOCK turned
on, to
Press
Turn SCROLL LOCK on or off SCROLL LOCK
Move to the cell in the upper-left
corner of the window
HOME
Move to the cell in the lower-right
corner of the window
END
Scroll one row up or down UP ARROW or
DOWN ARROW
Scroll one column left or right LEFT ARROW or
RIGHT ARROW
Tip When you use the scrolling keys (such as PAGE UP
and PAGE DOWN) with SCROLL LOCK turned off, your
selection moves the distance you scroll. If you want to
preserve your selection while you scroll through the
worksheet, turn on SCROLL LOCK first.
Print and preview a document by using shortcut
keys
To Press
Display the Print command (File
menu)
CTRL + P
Work in print preview
To Press
Move around the page when
zoomed in
Arrow keys
Move by one page when zoomed
out
PAGE UP or PAGE
DOWN
Move to the first page when
zoomed out
CTRL + UP
ARROW or CTRL +
LEFT ARROW
Move to the last page when
zoomed out
CTRL + DOWN
ARROW or CTRL +
RIGHT ARROW
Work in a data form by using shortcut keys
To Press
Select a field or a command button ALT + key, where
key is the underlined
letter in the field or
command name
Move to the same field in the next
record
DOWN ARROW
Move to the same field in the
previous record
UP ARROW
Move to the next field you can edit
in the record
TAB
Move to the previous field you can
edit in the record
SHIFT + TAB
Move to the first field in the next
record
ENTER
Move to the first field in the
previous record
SHIFT + ENTER
Move to the same field 10 records
forward
PAGE DOWN
Move to the same field 10 records
back
PAGE UP
Move to the new record CTRL
+ PAGE DOWN
Move to the first record CTRL + PAGE UP
Move to the beginning or end of a
field
HOME or END
Move one character left or right
within a field
LEFT ARROW or
RIGHT ARROW
Extend a selection to the
beginning of a field
SHIFT + HOME
Extend a selection to the end of a
field
SHIFT + END
Select the character to the left SHIFT + LEFT
ARROW
Select the character to the right SHIFT + RIGHT
ARROW
Work with the AutoFilter feature by using
shortcut keys
To Press
Display the AutoFilter list for the
current column
Select the cell that
contains the column
label, and then press
ALT
+ DOWN ARROW
Close the AutoFilter list for the
current column
ALT + UP ARROW
Select the next item in the
AutoFilter list
DOWN ARROW
Select the previous item in the
AutoFilter list
UP ARROW
Select the first item (All) in the
AutoFilter list
HOME
Select the last item in the
AutoFilter list
END
Filter the list by using the selected
item in the AutoFilter list
ENTER
Excel
Page 5 of 7
Work with the Pivot Table Wizard by using
shortcut keys
In Step 3 of the PivotTable
Wizard, to
Press
Select the next or previous field
button in the list
UP ARROW or
DOWN ARROW
Select the field button to the right
or left in a multicolumn field
button list
LEFT ARROW or
RIGHT ARROW
Move the selected field into the
Page area
ALT + P
Move the selected field into the
Row area
ALT + R
Move the selected field into the
Column area
ALT + C
Move the selected field into the
Data area
ALT + D
Display the PivotTable Field
dialog box
ALT + L
Work with page fields in a Pivot Table by using
shortcut keys
To Press
Select the previous item in the list UP ARROW
Select the next item in the list DOWN ARROW
Select the first visible item in the
list
HOME
Select the last visible item in the
list
END
Display the selected item ENTER
Group and ungroup Pivot Table items by using
shortcut keys
To Press
Group selected PivotTable items ALT + SHIFT
+ RIGHT ARROW
Ungroup selected PivotTable
items
ALT + SHIFT
+ LEFT ARROW
Keys for menus
To Press
Show a shortcut menu SHIFT + F10
Make the menu bar active F10 or ALT
Show the program icon menu (on
the program title bar)
ALT + SPACEBAR
Select the next or previous
command on the menu or
submenu
DOWN ARROW or
UP ARROW (with
the menu or
submenu displayed)
Select the menu to the left or right,
or, with a submenu visible, switch
between the main menu and the
submenu
LEFT ARROW or
RIGHT ARROW
Select the first or last command on
the menu or submenu
HOME or END
Close the visible menu and
submenu at the same time
ALT
Close the visible menu, or, with a
submenu visible, close the
submenu only
ESC
Tip You can select any menu command on the menu bar
or on a visible toolbar with the keyboard. Press ALT to
select the menu bar. (To then select a toolbar, press CTRL
+ TAB; repeat until the toolbar you want is selected.)
Press the letter that is underlined in the menu name that
contains the command you want. In the menu that appears,
press the letter underlined in the command name that you
want.
Keys for toolbars
On a toolbar, to Press
Make the menu bar active F10 or ALT
Select the next or previous toolbar CTRL + TAB or
CTRL + SHIFT +
TAB
Select the next or previous button
or menu on the toolbar
TAB or SHIFT +
TAB (when a toolbar
is active)
Open the selected menu ENTER
Perform the action assigned to the
selected button
ENTER
Enter text in the selected text box ENTER
Select an option from a drop-down
list box or from a drop-down
menu on a button
Arrow keys to move
through options in
the list or menu;
ENTER to select the
option you want
(when a drop-down
list box is selected)
Keys for windows and dialog boxes
In a window, to Press
Switch to the next program ALT + TAB
Switch to the previous program ALT + SHIFT
+ TAB
Show the Windows Start menu CTRL + ESC
Close the active workbook
window
CTRL + W
Restore the active workbook
window
CTRL + F5
Switch to the next workbook
window
CTRL + F6
Switch to the previous workbook
window
CTRL + SHIFT
+ F6
Carry out the Move command
(workbook icon menu, menu bar)
CTRL + F7
Carry out the Size command
(workbook icon menu, menu bar)
CTRL + F8
Minimize the workbook window
to an icon
CTRL + F9
Excel
Page 6 of 7
Maximize or restore the workbook
window
CTRL + F10
Select a folder in the Open or Save
As dialog box (File menu)
ALT + 0 to select the
folder list; arrow
keys to select a
folder
Choose a toolbar button in the
Open or Save As dialog box (File
menu)
ALT + number
(1 is the leftmost
button, 2 is the next,
and so on)
Update the files visible in the
Open or Save As dialog box (File
menu)
F5
In a dialog box, to Press
Switch to the next tab in a dialog
box
CTRL + TAB or
CTRL + PAGE
DOWN
Switch to the previous tab in a
dialog box
CTRL + SHIFT +
TAB or CTRL +
PAGE UP
Move to the next option or option
group
TAB
Move to the previous option or
option group
SHIFT + TAB
Move between options in the
active drop-down list box or
between some options in a group
of options
Arrow keys
Perform the action assigned to the
active button (the button with the
dotted outline), or select or clear
the active check box
SPACEBAR
Move to an option in a drop-down
list box
Letter key for the
first letter in the
option name you
want (when a dropdown
list box is
selected)
Select an option, or select or clear
a check box
ALT + letter, where
letter is the key for
the underlined letter
in the option name
Open the selected drop-down list
box
ALT + DOWN
ARROW
Close the selected drop-down list
box
ESC
Perform the action assigned to the
default command button in the
dialog box (the button with the
bold outline ¾ often the OK
button)
ENTER
Cancel the command and close the
dialog box
ESC
In a text box, to Press
Move to the beginning of the entry HOME
Move to the end of the entry END
Move one character to the left or
right
LEFT ARROW or
RIGHT ARROW
Move one word to the left or right CTRL + LEFT
ARROW or CTRL +
RIGHT ARROW
Select from the insertion point to
the beginning of the entry
SHIFT + HOME
Select from the insertion point to
the end of the entry
SHIFT + END
Select or unselect one character to
the left
SHIFT + LEFT
ARROW
Select or unselect one character to
the right
SHIFT + RIGHT
ARROW
Select or unselect one word to the
left
CTRL + SHIFT +
LEFT ARROW
Select or unselect one word to the
right
CTRL + SHIFT +
RIGHT ARROW
Keys for using the Office Assistant
To Press
Make the Office Assistant the
active balloon
ALT + F6;
repeat until the
balloon is active
Select a Help topic from the topics
displayed by the Office Assistant
ALT + topic number
(where 1 is the first
topic, 2 is the
second, and so on)
See more help topics ALT + DOWN
ARROW
See previous help topics ALT + UP ARROW
Close an Office Assistant message ESC
Get Help from the Office Assistant F1
Display the next tip ALT + N
Display the previous tip ALT + B
Close tips ESC
Show or hide the Office Assistant
in a wizard
TAB to select the
Office Assistant
button; SPACEBAR
to show or hide the
Assistant
Function Keys
Press To
F1 Display Help or
the Office
Assistant
SHIFT + F1 What's This?
ALT + F1 Insert a chart sheet
ALT + SHIFT + F1 Insert a new
worksheet
F2 Edit the active cell
SHIFT + F2 Edit a cell
comment
ALT + F2 Save As command
ALT + SHIFT + F2 Save command
Excel
Page 7 of 7
F3 Paste a name into a
formula
SHIFT + F3 Paste a function
into a formula
CTRL + F3 Define a name
CTRL + ALT + F3 Create names by
using row and
column labels
F4 Repeat the last
action
SHIFT + F4 Repeat the last
Find (Find Next)
CTRL + F4 Close the window
ALT + F4 Exit
F5 Go To
SHIFT + F5 Display the Find
dialog box
CTRL + F5 Restore the
window size
F6 Move to the next
pane
SHIFT + F6 Move to the
previous pane
CTRL + F6 Move to the next
workbook window
CTRL + SHIFT + F6 Move to the
previous workbook
window
F7 Spelling command
CTRL + F7 Move the window
F8 Extend a selection
SHIFT + F8 Add to the
selection
CTRL + F8 Resize the window
ALT + F8 Display the Macro
dialog box
F9 Calculate all sheets
in all open
workbooks
SHIFT + F9 Calculate the
active worksheet
CTRL + F9 Minimize the
workbook
F10 Make the menu bar
active
SHIFT + F10 Display a shortcut
menu
CTRL + F10 Maximize or
restore the
workbook window
F11 Create a chart
SHIFT + F11 Insert a new
worksheet
CTRL + F11 Insert a Microsoft
Excel 4.0 macro
sheet
ALT + F11 Display Visual
Basic Editor
F12 Save As command
SHIFT + F12 Save command
CTRL + F12 Open command
CTRL + SHIFT + F12 Print command
EXCEL Formulas
Adjust columns
Quickly move to left, right, top & bottom
Move/copy & insert data
Fill Series Options
Formulas
Relative & Absolute referencing
Shortcut to copy
Text functions
Conditional formulas
Lookup function
1
EXCEL SHORTCUTS:
Automatically adjust all columns to fit the data:
Click on the cell above row 1 and to the left of column A (selects all data on sheet
Go to any label and double click on the vertical line between the column labels (all columns will be adjust to fit the data)
To quickly select a large group of cells:
Click in the Name Box (box above column label A)
Type your cell range (a1:a5000)
Press enter
o Note: All your cells are highlighted. You can then apply desired formatting or move the block to a new location. Faster than clicking and dragging to select.
Option: With the cells highlighted, click in the Name box and type a descriptive name and enter. Click on any cell to deselect range. Click on the name box dropdown arrow and select the named cell range. This name can also be used in formulas. =sum(courses)
Move quickly to top/bottom/left and right:
Click on a cell
Double click on the right border line to go to the last cell on the right or
Double click on the left border line to go to the left most cell or
Double click on the top border line to go to the top most cell or
Double click on the bottom border line to go to the last cell
o Note: Will stop before the first blank row or column
Move cells to a new location:
Highlight a cell or group of cells
Click on the outside border of the selected cells (will see 4-headed arrow) and drag to new cell location
Move & insert data within existing rows of data:
Highlight a cell or group of cells
Press shift & click on the outside border of the selected cells (will see 4-headed arrow) and drag to new cell location to insert the data
o Note: If you don’t press the shift key, the data you move will overwrite existing data.
Move/Copy & insert data within existing rows of data:
Highlight a cell or group of cells
Right click on the outside border of the selected cells (will see 4-headed arrow) and drag to new cell location
2
Options include: Move Here, Copy Here, Copy Here as Values Only, Copy Here as Formats Only, Link Here, Create Hyperlink Here, Shift Down and Copy, Shift Right and Copy, Shift Down and Move, Shift Right and Move
o Note: Selecting one of the “Shift” options will always insert data, not overwrite existing data.
Use the Fill Series to enter data (Months, Numbers, Weekdays):
Enter data in your first cell i.e.: January
Click and drag the bottom right corner of the cell containing January to fill in all the months or double click on right cell corner to fill in until the last row.
Use the Fill Series to generate weekday dates:
Enter a start date
Right click and drag the bottom right corner of that cell to desired location
Select Fill Weekdays (notice options: Fill Months, Years, Series)
Options include: Copy Cells, Fill Series, Fill Formatting Only, Fill Without Formatting, Fill Days, Fill Weekdays, Fill Months, Fill Years, Linear Trend, Growth Trend, Series
FORMULAS:
Formulas can be entered by:
Using the AutoSum button ( Σ located on the Home and Formula tab) or
Typing the formula directly into a cell / example: = sum(b5:b100) or
Using the Insert Function (fx). The Insert Function (fx) helps you create formulas step by step through the use of a dialog box. You are prompted to enter the Arguments (the values to calculate). Arguments are parts of the formula. Example: =average(d3,d7,c11) The arguments are in parentheses after the function name.
Formula Examples Description
=sum(d2:h2)
Sum the cells d2 through h2
=(c2*.20)/3
Multiply c2 x .20 then divide by 3
=COUNTIF(H2:H120,"harkins")
Count the number of cells in the range H2:H120 that read harkins
=IF(SUM(D8:F8)>3,SUM(D8:F8)*30,SUM(D8:F8)*35)
If the sum of cells D8:F8 are greater than 3 then sum D8:F8 x 30 (true) else sum D8:F8 x 35 (false)
3
Use relative and absolute references:
Relative Referencing (most common)
A relative address automatically changes if you copy a formula to a new location on the worksheet.
Exercise: Enter the AutoSum button to calculate the total expenses. (Use the Forecast sheet tab):
1. Click in the blank cell: b15
2. Click Home / click on AutoSum Σ (editing group)
3. Press enter (formula is automatically entered: sum(b8:b14))
4. Copy the formula to the remaining cells: click on the bottom right corner of cell b15 and drag to e15 or use the copy/paste function
Exercise: Type the formula to calculate Net Income:
1. Click in the blank cell: b17
2. Type =b6-b15
3. Press enter
4. Copy the formula to the remaining cells: click on the bottom right of cell b17 and drag to e17 or use the copy/paste function
Exercise: Enter a formula to calculate the expenses for one year. Click in c8 (blank cell) and enter the formula to calculate the expense in b8 for one year. Formula: =b8*12
1. Copy the formula to the remaining cells. Check the formula in several cells to view relative referencing:
i. i.e.: = b8*12, =b9*12, =b10*12
Absolute Referencing
An absolute reference will always point to the location of a specific cell, even if you copy it. Great option when projecting increases.
To define an absolute reference: Press f4 before the cell address or type $ before row and column. $G$5
Exercise: Use absolute referencing to create a formula that references a cell containing a percent value. Find out what the expenses would be if they were increased by 4% increase:
i.e.: =(C8*$G$5)+C8 =(C9*$G$5)+C9 =(C10*$G$5)+C10
1. Go to cell g5 and enter a percent value = .04
4
2. Use absolute referencing in the formula to reference cell g5 instead of entering .04 in your formula
3. Enter the formula in cell d8 to calculate what the expense would be if you increased the expense of year one by 4%. Formula: =(C8*$G$5)+C8
4. Copy formula to remaining cells
5. After you get your answer, change .04 to .08 (formulas automatically update)
Exercise: Copy formulas to remaining cells:
1. Enter your first formula
2. Double click on the bottom right of the formula cell (will automatically fill in all formulas to the end of the column) or click and drag bottom right corner
TEXT Formulas
Exercise: Display only the first 3 characters of the building name using the function LEFT:
1. Insert a blank column after the building column
2. Click on fx (Insert Function)
3. Type left in the search box and press enter to find
4. Click ok or enter
5. Enter j2 in the text box
6. Enter 3 in num_chars box
7. Copy formula =LEFT(J2,4)
Note: You can use function “RIGHT” to display characters from the right or use function “MID” to display characters from the middle of the text string. With MID, need to specify starting character and number of characters; i.e.:=MID(f1,3,4)
Exercise: Combine 3 cells / fields (Dept, Number & Section) into one cell (Dept-Number-Section):
1. Insert a blank column after the section column
2. Click on fx (Insert Function)
3. Select the category “TEXT”
4. Click on Concatenate and click ok
5. Enter c2 in Text1 box
6. Enter – in Text2 box
7. Enter d2 in Text3 box
8. Enter – in Text4 box
9. Enter e2 in Text5 box
10. Copy your formula =CONCATENATE(C2,"-",D2,"-",E2)
5
Conditional Formula
The IF function performs a logical test on an argument (the values to calculate). Depending on the value of a cell, a certain function will be performed. If the argument is true a certain action will be performed and if the argument is false, a different action will be carried out. The Insert Function (fx) is helpful when using formulas containing logic.
Examples:
If cell is not blank, copy the value to current cell, otherwise copy a different cell value.
If someone ordered a quantity > 5, charge them $30 per item, otherwise, charge them $35 per item.
Exercise: Use the “Names” sheet tab and separate the names to read first, middle and last using the text to columns function. Then use the IF statement to list all last names in one column:
1. Select columns B:D and click on Home / Insert
2. Select column A and click on Data / Text to Columns
3. Use delimited then select space as the delimited character
4. Click finish
Note: You will see that all the last names do not appear in one column because some have middle initial or a suffix.
5. Click in cell d2 to enter your formula.
6. Click on the Insert Function (fx)
7. Type IF then press Enter / ok
8. On the Logical Test field enter c2 = “” (check for blank in c2)
9. On the If True field enter b2 (If c2 is blank, then enter name from b2)
10. On the If False field enter c2 (If c2 is not blank, then enter name from c2)
11. Click ok
12. Double click on bottom right formula cell or click and drag to copy formula =IF(C2="",B2,C2)
Option: Hide column B&C or Copy D and use Paste Special and only paste values
Additional Formulas
Exercise: Use the function AVERAGE to determine the average for a group of grades. Each grade is worth a different percentage value. The first grade is worth 10%, the second is worth 20%, the third is worth 30% and final is worth 40%.
1. Click on the sheet tab labeled “Lookup”
2. Delete the current Average formulas (c3:c12)
3. Enter the new formula in cell c3: =(D3*0.1)+(E3*0.2)+(F3*0.3)+(G3*0.4)
4. Copy the formula to the remaining cells
6
Exercise: Use the above example with the Lookup Function to have the system enter a letter grade based on a lookup tables:
Lookup functions are used to retrieve a value from a table. It’s great for getting the letter grades from the final number grades or entering a value based on a code.
HLOOKUP – searches across the top row of the range until the value is met
VLOOKUP – searches down the first column of the range until the value is found
1. Click on the tab labeled: lookup and click cell b3
2. Look at the table of grades (Note: table values need to be in ascending order)
3. Use the fx function and select category Lookup and Reference/function name vlookup
4. Lookup_value field: cell contain the number grade - c3
5. Table_array field: Highlight the table range - $a$18:$b$28 (absolute reference)
6. Row_index_num field: Specify the line the letter grade on 2 (2nd column of array) and click ok
7. Copy and paste the formula =VLOOKUP(C3,A18:B28,2)
Exercise: Determine the average of a series of grades without including the lowest grade. Sum the group of numbers then subtract the lowest number and then divide by 3. Use the MIN function to remove the lowest number:
1. Click in a blank cell where you want the total to display
2. Click in the formula bar and enter =(SUM(D3:G3)-MIN(D3:G3))/3
3. Copy formula
More Examples:
=IF(A3=35, "Call"," ")
If cell A3 is equal to 35, place the word “Call” in the cell.
If it doesn’t equal 35 then leave the cell blank.
Note: Text needs to be in quotes.
=IF(N2<=10,000,"Within budget","Over budget")
If the value in cell N2 is less than or equal to 10,000, then the formula displays "Within budget". Otherwise, the function displays "Over budget".
=IF(sum(d8:f8)>50, "bonus",sum(d8:f8))
If the sum of d8:f8 is greater than 50, enter the word “bonus”. If not greater than 50, just sum d8:f8.
=IF((AND(c6="DD",f6>20)),2,1)
Logical test AND(c6="DD",f6>20) no spaces
Value if true 2
Value if false 1
=networkdays(a2,a3)
Find the # of workdays between the two dates referenced.
EXCEL SHOTCUT KEYS2
Press To Select
Shift + Arrow Keys One cell in given direction
Ctrl + Shift + Arrow Keys To the edge of current data region
Ctrl + Spacebar Current column
Shift + Spacebar Current row
Ctrl + Shift + * Current region (contiguous rows/columns)
Alt + Semicolon Only visible cells
Shift + Home To the beginning of the row (from the active cell)
Ctrl + Shift + Home To the beginning of the sheet (from the active cell)
Ctrl + Shift + End To the end of the sheet (from the active cell)
Ctrl + A The entire worksheet
Ctrl + Shift + O Cells with comments
Data Entry
Press To
Enter, Tab or Arrow Keys Complete a cell entry
Esc Cancel data entry or editing
F2 Change to Edit Mode (in the active cell)
Ctrl + ; Insert the current date
Ctrl + Shift + : Insert the current time
Ctrl + K Insert a hyperlink
Ctrl + ‘ or Ctrl + Shift + “ Copy the value from the cell above
Alt + down arrow Display the AutoComplete list
(unique values in column)
Alt + Enter Start a new line in a cell
Ctrl + D Fill down (after a range is selected)
Ctrl + R Fill right (after a range is selected)
Ctrl + Enter Fill the selected range with the current entry
‘ Designate a number as text
Formulas
Press To
= (equal sign) Start a formula
Alt + = (equal sign) Insert the AutoSum function
F3 Paste a name into a formula
F9 Calculate all sheets in workbook
Shift + F9 Calculate the active sheet
Ctrl + ~ (tilde) Toggle between displaying formulas and values
Ctrl + Shift + Enter Enter the formula as an array
Editing
Press To
Ctrl + C Copy
Ctrl + X Cut
Ctrl + V Paste
Ctrl + Z Undo
Ctrl + - Delete cells
Ctrl + Shift + + Insert cells
Delete Clear the contents of the selected cell(s)
Backspace / Delete Delete the character to the left / right of the insertion
point (while in edit mode)
Ctrl + Delete Delete to the end of the line (from the insertion point)
Formatting
Press To
Ctrl + 1 Display the Format Cells dialog window
Ctrl + Shift ~ (tilde) Apply General number formatting
Ctrl + Shift + $ Apply Currency formatting
Ctrl + Shift + ! Apply Number formatting
(two decimals, thousands separator)
Ctrl + Shift + % Apply Percent formatting (no decimals)
Ctrl + Shift + ^ Apply Exponential formatting (no decimals)
Ctrl + Shift + # Apply Date formatting (d-m-yy)
Ctrl + Shift + @ Apply Time formatting
Ctrl + Shift + & Apply outline border
Ctrl + Shift + _ Remove all borders
Ctrl + B Apply or remove bold formatting
Ctrl + I Apply or remove italic formatting
Ctrl + U Apply or remove underline formatting
Ctrl + 5 Apply or remove strikethrough formatting
Ctrl + 9 Hide rows
Ctrl + Shift + ( Unhide rows
Ctrl + 0 (zero) Hide columns
Ctrl + Shift + ) Unhide columns
Select Chart Items
Press To Select
Down / Up Arrow The previous / next group of items
Right / Left Arrow The next / previous item within the group
Source: Microsoft Excel Help Excel Shortcut Booklet –01/23
EXCEL SHOTCUT KEYS
Press To
F4 or Ctrl + Y Repeat last action
Ctrl + F3 Define a name
Shift + F2 Edit /Insert a comment
Ctrl + P Display the Print menu
Shift + F10 Display the shortcut menu
Ctrl + F9 Minimize the active workbook
Ctrl + F10 Maximize or restore the active workbook
Ctrl + A Display the formula palette
(after you type a valid formula name)
Ctrl + Shift + A Insert the argument names and parentheses for a function
(after you type a valid formula name)
Excel Shortcut Key Matrix
Function Key
Only
Shift +
Function Key
Ctrl +
Function Key
Alt +
Function Key
Ctrl + Shift +
Function Key
Alt + Shift +
Function Key
F1 Display
Help
Display
What’s This
Insert
Chart
Insert
Worksheet
F2 Edit
Mode
Insert/Edit
Comment Save As
Save
F3 Paste Name
(in formula)
Paste
Function
Define
Name
Create
Names
F4 Repeat
Last Action
Find
Next
Close
Window Exit Close
Window
Exit
F5 Go To Find Restore
Window
F6 Next Pane
(split window)
Previous Pane
(split window)
Next
Workbook
Previous
Workbook
F7 Spell
Check
Move
Window
F8 Extend
Mode
Add to
Selection
Resize
Window
Macro
(dialog
window)
F9 Calculate
(all sheets)
Calculate
(active sheet)
Minimize
Workbook
F10 Menu Bar
Activate
Display
Shortcut
Menu
Restore
Window
F11 Create
Chart
Insert
Worksheet
Insert
Macro Sheet
Display
VBA Editor
F12 Save As Save Open Print
Note: Shortcuts that appear lighter are less beneficial to most users.
Note: Look up Shortcut in On-Line Help for additional shortcut keys (e.g., Print
Preview shortcuts, Data Form shortcuts, AutoFilter shortcuts, Pivot Table shortcuts,
Outline shortcuts, Toolbar shortcuts, and Dialog Window shortcuts).
Excel
Keyboard Shortcuts
Navigation
Press To Move
Arrow Keys One cell in given direction
Ctrl + Arrow Key To the edge of current data region
Enter / Shift + Enter One cell down / up
Tab / Shift + Tab One cell right / left
Home To the beginning of current row
Ctrl + Home To the beginning of worksheet
Ctrl + End To the end of worksheet
(intersection of last row and column used)
Page Down / Up One screen down / up
Alt + Page Down / Alt + Page Up One screen right / left
Ctrl + Page Down / Page Up To the next / previous sheet
F6 / Shift + F6 To the next / previous pane (in a split worksheet)
Ctrl + F6 / Ctrl + Shift + F6 To the next / previous workbook
Ctrl + Backspace To the active cell (to display the active cell)
Ctrl + . Move clockwise to the corners of the selected range
Ctrl + Alt + Right / Left Arrow Move right / left between nonadjacent selections
Source: Microsoft Excel Help Excel Shortcut Booklet –1/23
Keyboard Shortcuts for Microsoft Excel 2007
(Modified from: http://office.microsoft.com/en-us/excel-help/excel-shortcut-and-function-keys-HP010073848.aspx - retrieved 6/15/2010)
Document Contents
Finding and using keyboard shortcuts ........................................................................................................ 2
Microsoft Office basics........................................................................................................................... 2
Use dialog boxes .................................................................................................................................... 3
Use edit boxes within dialog boxes ......................................................................................................... 4
Use the Open and Save As dialog boxes .................................................................................................. 5
Undo and redo actions ............................................................................................................................ 5
Access and use task panes and galleries ................................................................................................. 6
Close a task pane ............................................................................................................................... 6
Move a task pane ............................................................................................................................... 6
Resize a task pane ............................................................................................................................... 6
Access and use smart tags ...................................................................................................................... 7
Navigating the Office Fluent Ribbon ....................................................................................................... 8
Change the keyboard focus without using the mouse ............................................................................ 9
Common tasks in Microsoft Excel ............................................................................................................. 10
CTRL combination shortcut keys ........................................................................................................... 10
Function keys ....................................................................................................................................... 14
Other useful shortcut keys .................................................................................................................... 17
2 | Page
Finding and using keyboard shortcuts
For keyboard shortcuts in which you press two or more keys simultaneously, the keys to press are separated by a plus sign (+) in Microsoft Office Word 2007 Help. For keyboard shortcuts in which you press one key immediately followed by another key, the keys to press are separated by a comma (,).
Microsoft Office basics
To do this
Press
Switch to the next window.
ALT+TAB
Switch to the previous window.
ALT+SHIFT+TAB
Close the active window.
CTRL+W or CTRL+F4
Restore the size of the active window after you maximize it.
ALT+F5
Move to a task pane from another pane in the program window (clockwise direction). You may need to press F6 more than once.
F6
Move to a task pane from another pane in the program window (counterclockwise direction).
SHIFT+F6
When more than one window is open, switch to the next window.
CTRL+F6
Switch to the previous window.
CTRL+SHIFT+F6
Maximize or restore a selected window.
CTRL+F10
Copy a picture of the screen to the Clipboard.
PRINT SCREEN
Copy a picture of the selected window to the Clipboard.
ALT+PRINT SCREEN
3 | Page
Use dialog boxes
To do this
Press
Move from an open dialog box back to the document, for dialog boxes such as Find and Replace that support this behavior.
ALT+F6
Move to the next option or option group.
TAB
Move to the previous option or option group.
SHIFT+TAB
Switch to the next tab in a dialog box.
CTRL+TAB
Switch to the previous tab in a dialog box.
CTRL+SHIFT+TAB
Move between options in an open drop-down list, or between options in a group of options.
Arrow keys
Perform the action assigned to the selected button; select or clear the selected check box.
SPACEBAR
Select an option; select or clear a check box.
ALT+ the letter underlined in an option
Open a selected drop-down list.
ALT+DOWN ARROW
Select an option from a drop-down list.
First letter of an option in a drop-down list
Close a selected drop-down list; cancel a command and close a dialog box.
ESC
Run the selected command.
ENTER
4 | Page
Use edit boxes within dialog boxes
An edit box is a blank in which you type or paste an entry, such as your user name or the path to a folder.
To do this
Press
Move to the beginning of the entry.
HOME
Move to the end of the entry.
END
Move one character to the left or right.
LEFT ARROW or RIGHT ARROW
Move one word to the left.
CTRL+LEFT ARROW
Move one word to the right.
CTRL+RIGHT ARROW
Select or unselect one character to the left.
SHIFT+LEFT ARROW
Select or unselect one character to the right.
SHIFT+RIGHT ARROW
Select or unselect one word to the left.
CTRL+SHIFT+LEFT ARROW
Select or unselect one word to the right.
CTRL+SHIFT+RIGHT ARROW
Select from the insertion point to the beginning of the entry.
SHIFT+HOME
Select from the insertion point to the end of the entry.
SHIFT+END
5 | Page
Use the Open and Save As dialog boxes
To do this
Press
Display the Open dialog box.
CTRL+F12 or CTRL+O
Display the Save As dialog box.
F12
Go to the previous folder.
ALT+1
Up One Level button: Open the folder one level above the open folder.
ALT+2
Delete button: Delete the selected folder or file.
DELETE
Create New Folder button: Create a new folder.
ALT+4
Views button: Switch among available folder views.
ALT+5
Display a shortcut menu for a selected item such as a folder or file.
SHIFT+F10
Move between options or areas in the dialog box.
TAB
Open the Look in list.
F4 or ALT+I
Update the file list.
F5
Undo and redo actions
To do this
Press
Cancel an action.
ESC
Undo an action.
CTRL+Z
Redo or repeat an action.
CTRL+Y
6 | Page
Access and use task panes and galleries
To do this
Press
Move to a task pane from another pane in the program window. (You may need to press F6 more than once.)
F6
When a menu is active, move to a task pane. (You may need to press CTRL+TAB more than once.)
CTRL+TAB
When a task pane is active, select the next or previous option in the task pane.
TAB or SHIFT+TAB
Display the full set of commands on the task pane menu.
CTRL+SPACEBAR
Perform the action assigned to the selected button.
SPACEBAR or ENTER
Open a drop-down menu for the selected gallery item.
SHIFT+F10
Select the first or last item in a gallery.
HOME or END
Scroll up or down in the selected gallery list.
PAGE UP or PAGE DOWN
Close a task pane
1. Press F6 to move to the task pane, if necessary.
2. Press CTRL+SPACEBAR.
3. Use the arrow keys to select Close, and then press ENTER.
Move a task pane
1. Press F6 to move to the task pane, if necessary.
2. Press CTRL+SPACEBAR.
3. Use the arrow keys to select Move, and then press ENTER.
4. Use the arrow keys to move the task pane, and then press ENTER.
Resize a task pane
1. Press F6 to move to the task pane, if necessary.
2. Press CTRL+SPACEBAR.
3. Use the arrow keys to select Size, and then press ENTER.
4. Use the arrow keys to resize the task pane, and then press ENTER.
7 | Page
Access and use smart tags
To do this
Press
Display the shortcut menu for the selected item.
SHIFT+F10
Display the menu or message for a smart tag or for the AutoCorrect Options button or the Paste options button. If more than one smart tag is present, switch to the next smart tag and display its menu or message.
ALT+SHIFT+F10
Select the next item on a smart tag menu.
DOWN ARROW
Select the previous item on a smart tag menu.
UP ARROW
Perform the action for the selected item on a smart tag menu.
ENTER
Close the smart tag menu or message.
ESC
8 | Page
Navigating the Office Fluent Ribbon
Note The Ribbon is a component of the Microsoft Office Fluent user interface.
Access keys provide a way to quickly use a command by pressing a few keys, no matter where you are in the program. Every command in Office Word 2007 can be accessed by using an access key. You can get to most commands by using two to five keystrokes. To use an access key:
1. Press ALT.
The KeyTips are displayed over each feature that is available in the current view.
The above image was excerpted from Training on Microsoft Office Online.
2. Press the letter shown in the KeyTip over the feature that you want to use.
3. Depending on which letter you press, you may be shown additional KeyTips. For example, if the Home tab is active and you press I, the Insert tab is displayed, along with the KeyTips for the groups on that tab.
4. Continue pressing letters until you press the letter of the command or control that you want to use. In some cases, you must first press the letter of the group that contains the command.
Note To cancel the action that you are taking and hide the KeyTips, press ALT.
9 | Page
Change the keyboard focus without using the mouse
Another way to use the keyboard to work with programs that feature the Office Fluent Ribbon is to move the focus among the tabs and commands until you find the feature that you want to use. The following table lists some ways to move the keyboard focus without using the mouse.
To do this
Press
Select the active tab of the Ribbon and activate the access keys.
ALT or F10. Press either of these keys again to move back to the document and cancel the access keys.
Move to another tab of the Ribbon.
F10 to select the active tab, and then LEFT ARROW or RIGHT ARROW
Hide or show the Ribbon.
CTRL+F1
Display the shortcut menu for the selected command.
SHIFT+F10
Move the focus to select each of the following areas of the window:
• Active tab of the Ribbon
• Any open task panes
• Status bar at the bottom of the window
• Your document
F6
Move the focus to each command on the Ribbon, forward or backward, respectively.
TAB or SHIFT+TAB
Move down, up, left, or right, respectively, among the items on the Ribbon.
DOWN ARROW, UP ARROW, LEFT ARROW, or RIGHT ARROW
Activate the selected command or control on the Ribbon.
SPACEBAR or ENTER
Open the selected menu or gallery on the Ribbon.
SPACEBAR or ENTER
Activate a command or control on the Ribbon so you can modify a value.
ENTER
Finish modifying a value in a control on the Ribbon, and move focus back to the document.
ENTER
Get help on the selected command or control on the Ribbon. (If no Help topic is associated with the selected command, a general Help topic about the program is shown instead.)
F1
10 | Page
Common tasks in Microsoft Excel
The following lists contain CTRL combination shortcut keys, function keys, and some other common shortcut keys, along with descriptions of their functionality.
CTRL combination shortcut keys
To do this
Press
Unhides any hidden rows within the selection.
CTRL+SHIFT+(
Unhides any hidden columns within the selection.
CTRL+SHIFT+)
Applies the outline border to the selected cells.
CTRL+SHIFT+&
Removes the outline border from the selected cells.
CTRL+SHIFT_
Applies the General number format.
CTRL+SHIFT+~
Applies the Currency format with two decimal places (negative numbers in parentheses).
CTRL+SHIFT+$
Applies the Percentage format with no decimal places.
CTRL+SHIFT+%
Applies the Exponential number format with two decimal places.
CTRL+SHIFT+^
Applies the Date format with the day, month, and year.
CTRL+SHIFT+#
Applies the Time format with the hour and minute, and AM or PM.
CTRL+SHIFT+@
Applies the Number format with two decimal places, thousands separator, and minus sign (-) for negative values.
CTRL+SHIFT+!
Selects the current region around the active cell (the data area enclosed by blank rows and blank columns).
In a PivotTable, it selects the entire PivotTable report.
CTRL+SHIFT+*
Enters the current time.
CTRL+SHIFT+:
Copies the value from the cell above the active cell into the cell or the Formula Bar.
CTRL+SHIFT+"
Displays the Insert dialog box to insert blank cells.
CTRL+SHIFT+Plus (+)
Displays the Delete dialog box to delete the selected cells.
CTRL+Minus (-)
11 | Page
To do this
Press
Enters the current date.
CTRL+;
Alternates between displaying cell values and displaying formulas in the worksheet.
CTRL+`
Copies a formula from the cell above the active cell into the cell or the Formula Bar.
CTRL+'
Displays the Format Cells dialog box.
CTRL+1
Applies or removes bold formatting.
CTRL+2
Applies or removes italic formatting.
CTRL+3
Applies or removes underlining.
CTRL+4
Applies or removes strikethrough.
CTRL+5
Alternates between hiding objects, displaying objects, and displaying placeholders for objects.
CTRL+6
Displays or hides the outline symbols.
CTRL+8
Hides the selected rows.
CTRL+9
Hides the selected columns.
CTRL+0
Selects the entire worksheet.
If the worksheet contains data, CTRL+A selects the current region. Pressing CTRL+A a second time selects the current region and its summary rows. Pressing CTRL+A a third time selects the entire worksheet.
When the insertion point is to the right of a function name in a formula, displays the Function Arguments dialog box.
CTRL+SHIFT+A inserts the argument names and parentheses when the insertion point is to the right of a function name in a formula.
CTRL+A
Applies or removes bold formatting.
CTRL+B
12 | Page
To do this
Press
Copies the selected cells.
CTRL+C followed by another CTRL+C displays the Clipboard.
CTRL+C
Uses the Fill Down command to copy the contents and format of the topmost cell of a selected range into the cells below.
CTRL+D
Displays the Find and Replace dialog box, with the Find tab selected.
SHIFT+F5 also displays this tab, while SHIFT+F4 repeats the last Find action.
CTRL+SHIFT+F opens the Format Cells dialog box with the Font tab selected.
CTRL+F
Displays the Go To dialog box.
F5 also displays this dialog box.
CTRL+G
Displays the Find and Replace dialog box, with the Replace tab selected.
CTRL+H
Applies or removes italic formatting.
CTRL+I
Displays the Insert Hyperlink dialog box for new hyperlinks or the Edit Hyperlink dialog box for selected existing hyperlinks.
CTRL+K
Creates a new, blank workbook.
CTRL+N
Displays the Open dialog box to open or find a file.
CTRL+SHIFT+O selects all cells that contain comments.
CTRL+O
Displays the Print dialog box.
CTRL+SHIFT+P opens the Format Cells dialog box with the Font tab selected.
CTRL+P
Uses the Fill Right command to copy the contents and format of the leftmost cell of a selected range into the cells to the right.
CTRL+R
13 | Page
To do this
Press
Saves the active file with its current file name, location, and file format.
CTRL+S
Displays the Create Table dialog box.
CTRL+T
Applies or removes underlining.
CTRL+SHIFT+U switches between expanding and collapsing of the formula bar.
CTRL+U
Inserts the contents of the Clipboard at the insertion point and replaces any selection. Available only after you have cut or copied an object, text, or cell contents.
CTRL+ALT+V displays the Paste Special dialog box. Available only after you have cut or copied an object, text, or cell contents on a worksheet or in another program.
CTRL+V
Closes the selected workbook window.
CTRL+W
Cuts the selected cells.
CTRL+X
Repeats the last command or action, if possible.
CTRL+Y
Uses the Undo command to reverse the last command or to delete the last entry that you typed.
CTRL+SHIFT+Z uses the Undo or Redo command to reverse or restore the last automatic correction when AutoCorrect Smart Tags are displayed.
CTRL+Z
14 | Page
Function keys
Description
Key
Displays the Microsoft Office Excel Help task pane.
CTRL+F1 displays or hides the Ribbon, a component of the Microsoft Office Fluent user interface.
ALT+F1 creates a chart of the data in the current range.
ALT+SHIFT+F1 inserts a new worksheet.
F1
Edits the active cell and positions the insertion point at the end of the cell contents. It also moves the insertion point into the Formula Bar when editing in a cell is turned off.
SHIFT+F2 adds or edits a cell comment.
CTRL+F2 displays the Print Preview window.
F2
Displays the Paste Name dialog box.
SHIFT+F3 displays the Insert Function dialog box.
F3
Repeats the last command or action, if possible.
CTRL+F4 closes the selected workbook window.
F4
Displays the Go To dialog box.
CTRL+F5 restores the window size of the selected workbook window.
F5
Switches between the worksheet, Ribbon, task pane, and Zoom controls. In a worksheet that has been split (View menu, Manage This Window, Freeze Panes, Split Window command), F6 includes the split panes when switching between panes and the Ribbon area.
SHIFT+F6 switches between the worksheet, Zoom controls, task pane, and Ribbon.
CTRL+F6 switches to the next workbook window when more than one workbook window is open.
F6
15 | Page
Description
Key
Displays the Spelling dialog box to check spelling in the active worksheet or selected range.
CTRL+F7 performs the Move command on the workbook window when it is not maximized. Use the arrow keys to move the window, and when finished press ENTER, or ESC to cancel.
F7
Turns extend mode on or off. In extend mode, Extended Selection appears in the status line, and the arrow keys extend the selection.
SHIFT+F8 enables you to add a nonadjacent cell or range to a selection of cells by using the arrow keys.
CTRL+F8 performs the Size command (on the Control menu for the workbook window) when a workbook is not maximized.
ALT+F8 displays the Macro dialog box to create, run, edit, or delete a macro.
F8
Calculates all worksheets in all open workbooks.
SHIFT+F9 calculates the active worksheet.
CTRL+ALT+F9 calculates all worksheets in all open workbooks, regardless of whether they have changed since the last calculation.
CTRL+ALT+SHIFT+F9 rechecks dependent formulas, and then calculates all cells in all open workbooks, including cells not marked as needing to be calculated.
CTRL+F9 minimizes a workbook window to an icon.
F9
16 | Page
Description
Key
Turns key tips on or off.
SHIFT+F10 displays the shortcut menu for a selected item.
ALT+SHIFT+F10 displays the menu or message for a smart tag. If more than one smart tag is present, it switches to the next smart tag and displays its menu or message.
CTRL+F10 maximizes or restores the selected workbook window.
F10
Creates a chart of the data in the current range.
SHIFT+F11 inserts a new worksheet.
ALT+F11 opens the Microsoft Visual Basic Editor, in which you can create a macro by using Visual Basic for Applications (VBA).
F11
Displays the Save As dialog box.
F12
17 | Page
Other useful shortcut keys
Description
Key
Move one cell up, down, left, or right in a worksheet.
CTRL+ARROW KEY moves to the edge of the current data region (data region: A range of cells that contains data and that is bounded by empty cells or datasheet borders.) in a worksheet.
SHIFT+ARROW KEY extends the selection of cells by one cell.
CTRL+SHIFT+ARROW KEY extends the selection of cells to the last nonblank cell in the same column or row as the active cell, or if the next cell is blank, extends the selection to the next nonblank cell.
LEFT ARROW or RIGHT ARROW selects the tab to the left or right when the Ribbon is selected. When a submenu is open or selected, these arrow keys switch between the main menu and the submenu. When a Ribbon tab is selected, these keys navigate the tab buttons.
DOWN ARROW or UP ARROW selects the next or previous command when a menu or submenu is open. When a Ribbon tab is selected, these keys navigate up or down the tab group.
In a dialog box, arrow keys move between options in an open drop-down list, or between options in a group of options.
DOWN ARROW or ALT+DOWN ARROW opens a selected drop-down list.
ARROW KEYS
Deletes one character to the left in the Formula Bar.
Also clears the content of the active cell.
In cell editing mode, it deletes the character to the left of the insertion point.
BACKSPACE
18 | Page
Description
Key
Removes the cell contents (data and formulas) from selected cells without affecting cell formats or comments.
In cell editing mode, it deletes the character to the right of the insertion point.
DELETE
Moves to the cell in the lower-right corner of the window when SCROLL LOCK is turned on.
CTRL+END moves to the last cell on a worksheet, in the lowest used row of the rightmost used column. If the cursor is in the formula bar, CTRL+END moves the cursor to the end of the text.
CTRL+SHIFT+END extends the selection of cells to the last used cell on the worksheet (lower-right corner). If the cursor is in the formula bar, CTRL+SHIFT+END selects all text in the formula bar from the cursor position to the end—this does not affect the height of the formula bar.
END
Completes a cell entry from the cell or the Formula Bar, and selects the cell below (by default).
In a data form, it moves to the first field in the next record.
Opens a selected menu (press F10 to activate the menu bar) or performs the action for a selected command.
In a dialog box, it performs the action for the default command button in the dialog box (the button with the bold outline, often the OK button).
ALT+ENTER starts a new line in the same cell.
CTRL+ENTER fills the selected cell range with the current entry.
SHIFT+ENTER completes a cell entry and selects the cell above.
ENTER
19 | Page
Description
Key
Cancels an entry in the cell or Formula Bar.
Closes an open menu or submenu, dialog box, or message window.
It also closes full screen mode when this mode has been applied, and returns to normal screen mode to display the Ribbon and status bar again.
ESC
Moves to the beginning of a row in a worksheet.
Moves to the cell in the upper-left corner of the window when SCROLL LOCK is turned on.
Selects the first command on the menu when a menu or submenu is visible.
CTRL+HOME moves to the beginning of a worksheet.
CTRL+SHIFT+HOME extends the selection of cells to the beginning of the worksheet.
HOME
Moves one screen down in a worksheet.
ALT+PAGE DOWN moves one screen to the right in a worksheet.
CTRL+PAGE DOWN moves to the next sheet in a workbook.
CTRL+SHIFT+PAGE DOWN selects the current and next sheet in a workbook.
PAGE DOWN
Moves one screen up in a worksheet.
ALT+PAGE UP moves one screen to the left in a worksheet.
CTRL+PAGE UP moves to the previous sheet in a workbook.
CTRL+SHIFT+PAGE UP selects the current and previous sheet in a workbook.
PAGE UP
20 | Page
Description
Key
In a dialog box, performs the action for the selected button, or selects or clears a check box.
CTRL+SPACEBAR selects an entire column in a worksheet.
SHIFT+SPACEBAR selects an entire row in a worksheet.
CTRL+SHIFT+SPACEBAR selects the entire worksheet.
• If the worksheet contains data, CTRL+SHIFT+SPACEBAR selects the current region. Pressing CTRL+SHIFT+SPACEBAR a second time selects the current region and its summary rows. Pressing CTRL+SHIFT+SPACEBAR a third time selects the entire worksheet.
• When an object is selected, CTRL+SHIFT+SPACEBAR selects all objects on a worksheet.
ALT+SPACEBAR displays the Control menu for the Microsoft Office Excel window.
SPACEBAR
Moves one cell to the right in a worksheet.
Moves between unlocked cells in a protected worksheet.
Moves to the next option or option group in a dialog box.
SHIFT+TAB moves to the previous cell in a worksheet or the previous option in a dialog box.
CTRL+TAB switches to the next tab in dialog box.
CTRL+SHIFT+TAB switches to the previous tab in a dialog box.
TAB
Saturday, October 31, 2015
Ms Excel If function
The IF function is one of the most popular and useful functions in Excel. You use the IF function to ask Excel to test a condition and to return one value if the condition is met, and another value if the condition is not met.
In this tutorial, we are going to learn the syntax and common usages of Excel IF function, and then will have a closer look at formula examples that will hopefully prove helpful both to beginners and experienced Excel users.
Excel IF function - syntax and usageUsing the IF function in Excel - formula examplesIF examples for numbersHow to use the IF function with text valuesUsing Excel IF function with datesExcel IF examples for blank, non-blank cells
Excel IF function - syntax and usage
The IF function is one of Excel's logical functions that evaluates a certain condition and returns the value you specify if the condition is TRUE, and another value if the condition is FALSE.
The syntax for Excel IF is as follows:
IF(logical_test, [value_if_true], [value_if_false])
As you see, the IF function has 3 arguments, but only the first one is obligatory, the other two are optional.
logical_test - a value or logical expression that can be either TRUE or FALSE. Required.In this argument, you can specify a text value, date, number, or any comparison operator. For example, your logical test can be expressed as or B1="sold", B1<12/1/2014, B1=10 or B1>10.value_if_true - the value to return when the logical test evaluates to TRUE, i.e. if the condition is met. Optional.For example, the following formula will return the text "Good" if a value in cell B1 is greater than 10: =IF(B1>10, "Good")value_if_false - the value to be returned if the logical test evaluates to FALSE, i.e. if the condition is not met. Optional.For example, if you add "Bad" as the third parameter to the above formula, it will return the text "Good" if a value in cell B1 is greater than 10, otherwise, it will return "Bad": =IF(B1>10, "Good", "Bad")
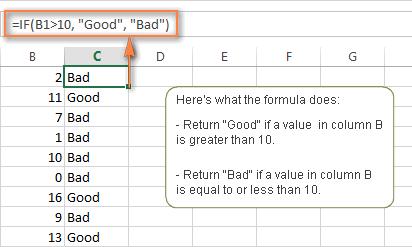
Excel IF function - things to remember!
Though the last two parameters of the IF function are optional, your formula may produce unexpected results if you don't know the underlying logic beneath the hood.
1. If value_if_true is omitted.
If the value_if_true argument is omitted in your Excel IF formula (i.e. there is only a comma following logical_test), the IF function returns zero (0) when the condition is met. Here is an example of such a formula: =IF(B1>10,, "Bad")
If you don't want your IF formula to display any value when the condition is met, enter double quotes ("") in the second parameter, like this: =IF(B1>10, "", "Bad") Technically, in this case the formula returns an empty string, which is invisible to the user but perceivable to other Excel functions.
The following screenshot demonstrates the above approaches in action, and the second one seems to be more sensible:
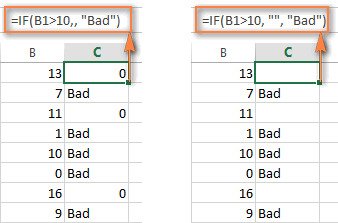
2. If value_if_false is omitted.
If you don't care what happens if the specified condition is not met, you can omit the 3rd parameter in your Excel IF formulas, which will result in the following.
If the logical test evaluates to FALSE and the value_if_false parameter is omitted (there is just a closing bracket after the value_if_true argument), the IF function returns the logical value FALSE. It's a bit unexpected, isn't it? Here is an example of such a formula: =IF(B1>10, "Good")
If you put a comma after the value_if_true argument, your IF function will returns 0, which doesn't make much sense either: =IF(B1>10, "Good",)
And again, the most reasonable approach is to put "" in the third argument, in this case you will have empty cells when the condition is not met: =IF(B1>10, "Good", "")
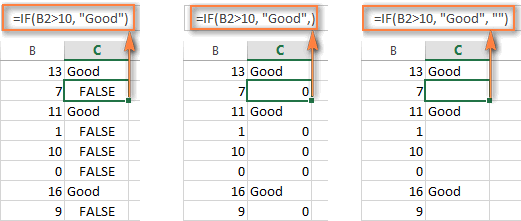
3. Get the IF function to display logical values TRUE or FALSE
If you want your Excel IF formula to display the logical values TRUE and FALSE when the specified condition is met and not met, respectively, type TRUE in the value_if_true argument. The value_if_false parameter can be FALSE or omitted. Here's a formula example:
=IF(B1>10, TRUE, FALSE)
or
=IF(B1>10, TRUE)
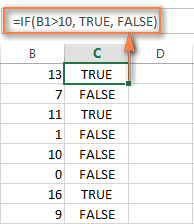
Note. If you want your IF formula to return TRUE and FALSE as the logical values(Boolean) that other Excel formulas can recognize, make sure you don't enclose them in double quotes. A visual indication of a Boolean is middle align in a cell, as you see in the screenshot above.
If you want to "TRUE" and "FALSE" to be usual text values, enclose them in "double quotes". In this case, the returned values will be aligned left and formatted as General. No Excel formula will recognize such "TRUE" and "FALSE" text as logical values.
4. Get IF to perform a math operation and return a result
Instead of returning certain values, you can make your IF formula to test the specified condition, perform a corresponding math operation and return a value based on the result. You do this by using arithmetic operators or other Excel functions in the value_if_true and /or value_if_false arguments. Here are just a couple of formula examples:
Example 1: =IF(A1>B1, C3*10, C3*5)
The formula compares the values in cells A1 and B1, and if A1 is greater than B1, it multiplies the value in cell C3 by 10, by 5 otherwise.
Example 2: =IF(A1<>B1, SUM(A1:D1), "")
The formula compares the values in cells A1 and B1, and if A1 is not equal to B1, the formula returns the sum of values in cells A1:D1, an empty string otherwise.
Using the IF function in Excel - formula examples
Now that you are familiar with the Excel IF function's syntax, let's look at some formula examples and learn how to use IF as a worksheet function in Excel.
IF function examples for numbers: greater than, less than, equal to
The use of the IF function with numeric values is based on using different comparison operators to express your conditions. You will find the full list of logical operators illustrated with formula examples in the table below.
ConditionOperatorFormula ExampleDescriptionGreater than>=IF(A2>5, "OK",)If the number in cell A2 is greater than 5, the formula returns "OK"; otherwise 0 is returned.Less than<=IF(A2<5, "OK", "")If the number in cell A2 is less than 5, the formula returns "OK"; an empty string otherwise.Equal to==IF(A2=5, "OK", "Wrong number")If the number in cell A2 is equal to 5, the formula returns "OK"; otherwise the function displays "Wrong number".Not equal to<>=IF(A2<>5, "Wrong number", "OK")If the number in cell A2 is not equal to 5, the formula returns "Wrong number "; otherwise - "OK".Greater than or equal to>==IF(A2>=5, "OK", "Poor")If the number in cell A2 is greater than or equal to 5, the formula returns "OK"; otherwise - "Poor".Less than or equal to<==IF(A2<=5, "OK", "")If the number in cell A2 is less than or equal to 5, the formula returns "OK"; an empty string otherwise.
The screenshot below demonstrates the IF formula with the "Greater than or equal to" logical operator in action:
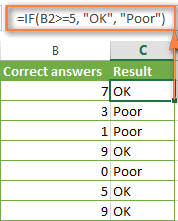
Excel IF function examples for text values
Generally, you write an IF formula for text values using either "equal to" or "not equal to" operator, as demonstrated in a couple of IF examples that follow.
Example 1. Case-insensitive IF formula for text values
Like the overwhelming majority of Excel functions, IF is case-insensitive by default. What it means for you is that logical tests for text values do not recognize case in usual IF formulas.
For example, the following IF formula returns either "Yes" or "No" based on the "Delivery Status" (column C):
=IF(C2="delivered", "No", "Yes")
Translated into the plain English, the formula tells Excel to return "No" if a cell in column C contains the word "Delivered", otherwise return "Yes". At that, it does not really matter how you type the word "Delivered" in the logical_test argument - "delivered", "Delivered", or "DELIVERED". Nor does it matter whether the word "Delivered" is in lowercase or uppercase in the source table, as illustrated in the screenshot below.
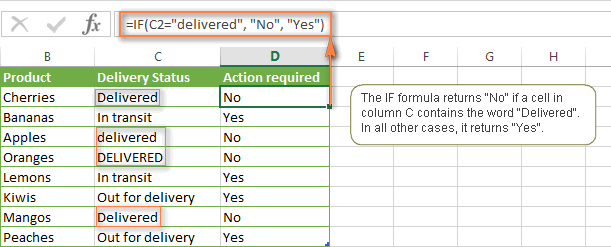
Another way to achieve exactly the same result is to use the "not equal to" operator and swap the value_if_true and value_if_false arguments:
=IF(C2<>"delivered", "Yes", "No")
Example 2. Case-sensitive IF formula for text values
If you want a case-sensitive logical test, use the IF function in combination with EXACT that compares two text strings and returns TRUE if the strings are exactly the same, otherwise it returns FALSE. The EXACT functions is case-sensitive, though it ignores formatting differences.
You use IF with EXACT in this way:
=IF(EXACT(C2,"DELIVERED"), "No", "Yes")
Where C is the column to which your logical test applies and "DELIVERED" is the case-sensitive text value that needs to be matched exactly.
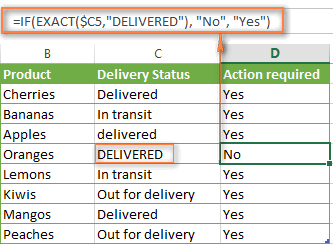
Naturally, you can also use a cell reference rather than a text value in the 2nd argument of the EXACT function, if you want to.
Note. When using text values as parameters for your IF formulas, remember to always enclose them in "double quotes".
Example 3. IF formula for text values with partial match
If you want to base your condition on a partial match rather than exact match, an immediate solution that comes to mind is using wildcard characters (* or ?) in the logical_test argument. However, this simple and obvious approach won't work. Many Excel functions accept wildcards, but regrettably IF is not one of them.
A solution is to use IF in combination with ISNUMBER and SEARCH (case-insensitive) or FIND (case-sensitive) functions.
For example, if No action is required both for "Delivered" and "Out for delivery" items, the following formula will work a treat:
=IF(ISNUMBER(SEARCH("deliv",C2)), "No", "Yes")
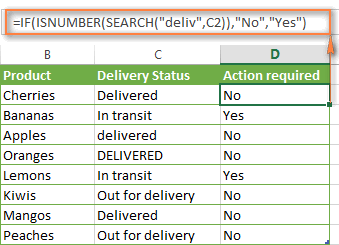
We've used the SEARCH function in the above formula since a case-insensitive match suits better for our data. If you want a case-sensitive match, simply replace SEARCH with FIND in this way:
=IF(ISNUMBER(FIND("text", where to search)), value_if_true, value_if_false)
Excel IF formula examples for dates
At first sight, it may seem that IF formulas for dates are identical to IF functions for numeric and text values that we've just discussed. Regrettably, it is not so.
Unlike many other Excel functions, IF cannot recognize dates and interprets them as mere text strings, which is why you cannot express your logical test simply as >"11/19/2014" or >11/19/2014. Neither of the above arguments is correct, alas.
Example 1. IF formulas for dates with DATEVALUE function
To make the Excel IF function to recognize a date in your logical test as a date, you have to wrap it in the DATEVALUE function, like this DATEVALUE("11/19/2014"). The complete IF formula may take the following shape:
=IF(C2<DATEVALUE("11/19/2014"), "Completed", "Coming soon")
As illustrated in the screenshot below, this IF formula evaluates the dates in column C and returns "Completed" if a game was played before Nov-11. Otherwise, the formula returns "Coming soon".
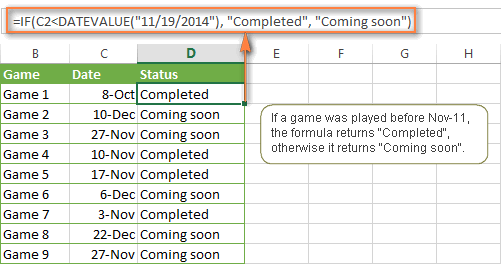
Example 2. IF formulas with TODAY() function
In case you base your condition on the current date, you can use the TODAY() function in the logical_test argument of your IF formula. For example:
=IF(C2<DATEVALUE("11/19/2014"), "Completed", "Coming soon")
Naturally, the Excel IF function can understand more complex logical tests, as demonstrated in the next example.
Example 3. Advanced IF formulas for future and past dates
Suppose, you want to mark only the dates that occur in more than 30 days from now. In this case, you can express the logical_test argument as A2-TODAY()>30. The complete IF formula may be as follows:
=IF(A2-TODAY()>30, "Future date", "")
To point out past dates that occurred more than 30 days ago, you can use the following IF formula:
=IF(TODAY()-A2>30, "Past date", "")
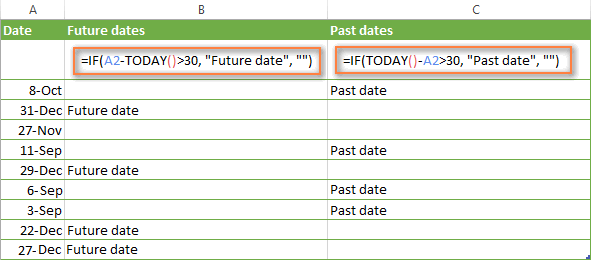
If you want to have both indications in one column, you will need to use a nested IF function like this:
=IF(A2-TODAY()>30, "Future date", IF(TODAY()-A2>30, "Past date", ""))
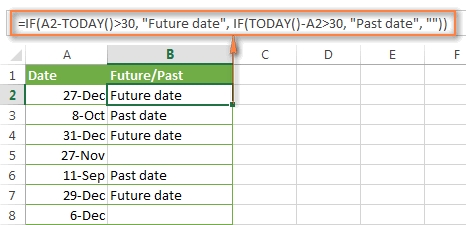
Excel IF examples for blank, non-blank cells
If you want to somehow mark your data based on a certain cell(s) being empty or not empty, you can either:
Use the Excel IF function in conjunction with ISBLANK, orUse the logical expressions ="" (equal to blank) or <>"" (not equal to blank).
The table below explains the difference between these two approaches and provides formula example.
Logical testDescriptionFormula ExampleBlank cells=""Evaluates to TRUE if a specified cell is visually empty, including cells withzero length strings.
Otherwise, evaluates to FALSE.
=IF(A1="", 0, 1)
Returns 0 if A1 is visually blank. Otherwise returns 1.
If A1 contains an empty string, the formula returns 0.
ISBLANK()Evaluates to TRUE is a specified cell containsabsolutely nothing - no formula, no empty string returned by some other formula.
Otherwise, evaluates to FALSE.
=IF(ISBLANK(A1), 0, 1)
Returns the results identical to the above formula but treats cells with zero length strings as non-blank cells.
That is, if A1 contains an empty string, the formula returns 1.
Non-blank cells<>""Evaluates to TRUE if a specified cell contains some data. Otherwise, evaluates to FALSE.
Cells withzero length strings are consideredblank.
=IF(A1<>"", 1, 0)
Returns 1 if A1 is non-blank; otherwise returns 0.
If A1 contains an empty string, the formula returns 0.
ISBLANK()=FALSEEvaluates to TRUE if a specified cell is not empty. Otherwise, evaluates to FALSE.
Cells withzero length strings are considerednon-blank.
=IF(ISBLANK(A1)=FALSE, 0, 1)
Works the same as the above formula, but returns 1 if A1 contains an empty string.
The following example demonstrates blank / non-blank logical test in action.
Suppose, you have a date in column C only if a corresponding game (column B) was played. Then, you can use either of the following IF formulas to mark completed games:
=IF($C2<>"", "Completed", "")
=IF(ISBLANK($C2)=FALSE, "Completed", "")
Since there are no zero-length strings in our table, both formulas will return identical results:
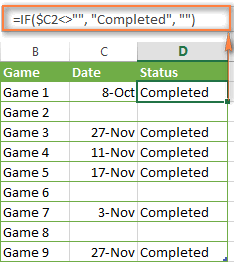
Hopefully, the above examples have helped you understand the general logic of the IF function. In practice, however, you would often want a single IF formula to check multiple conditions, and our next article will show you how to tackle this task. In addition, we will also explore nested IF functions, array IF formulas,IFEFFOR and IFNA functions and more. Please stay tuned and thank you for reading!